| Thanks to the fine folks at Frontline Hobbies I picked up one of the HKM 1/32 B-17G's and figuring if I did non build it directly away it would never get built, I jumped directly in. I likewise wanted to build it before the inevitable avalanche of later on market place parts got too large to resist, so to minimise the temptation my build will be finished (or well progressed hopefully) before they outset to exist purchasable. Its a big kit for sure, but not a complicated kit from my intial analysis. At 577 parts its not really that complex by todays standards (the Tamiya 1/32 F-16 has 526, the Tamiya 1/32 F4U has 453 etc) Storage for me is a trouble. This model will be a monster with a 1 meter wing bridge when complete. I simply accept no place to display a model that big in my home. So why purchase it I hear yous say ? Well the folks at HKM have come with a clever thought. They provide us with a wall mounting kit. Thats correct, a special jig thats designed to slot into the models bomb bay and allow you to hang it on the wall. I actually liked that idea and so the single biggest roadblock to my purchasing this kit went away. As I built this model I found many useful links to reference material on the B-17 and I include the all-time ones here: - 360° Photos of the B-17 Crew Positions
- Interior Colours of US Aircraft, 1941-45
Accessories used in this build:
- Eduard - Paint Mask for B-17G (EDJX155)
- Kits-World - Boeing B-17F/B-17G Flying Fortress Comprehensive General stencilling (KW32069)
- Eduard Brassin - Boeing B-17G Flying Fortress wheels (ED632017)
- Profimodeller - Boeing B-17G Flying Fortress gun barrels (PF32150P)
Errors found in the kit instructions (so far):
- Footstep 20 - G34 should read J34
- Step 20 - G35 should read J35
- Step 23 - R5 should read K5
- Footstep 24 - N22 should read N12
- Pace 29 - N5 should read N6
|
|
Building - Hong Kong Models 1:32 B-17G (HKM-01E04) |
|
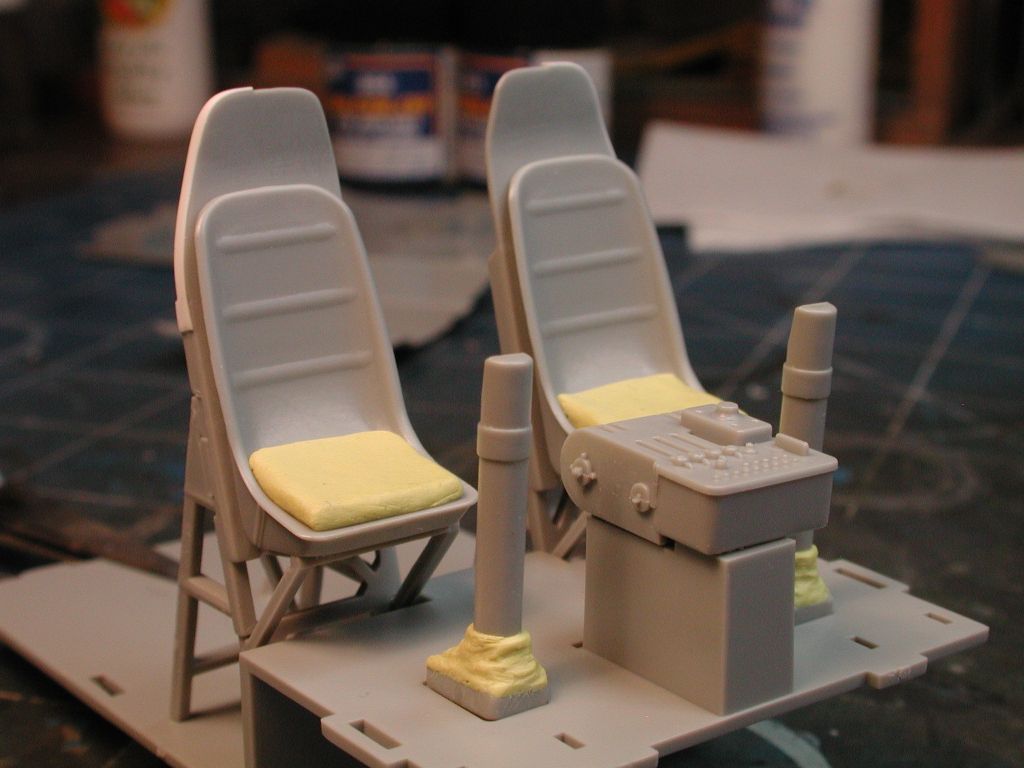
| As usual the build begins in the cockpit. In full general the accurateness of this kit is pretty good and as a result I have non felt too tempted to undertake major wholesale corrections or indeed detailing (as a quick dry fit of the cockpit in the fuselage reveals that you really won't see that much anyway). Uncomplicated enhancements like the seat cushions (back cushion to be added still) and the canvas boot on the control columns are easy (and fun) additions. |
 |
|
| The tiptop of the armour plating on the seats will be visible through the cockpit windows and I chose to replace the trim with 10 g plastic bill of fare strip. Some ejection pins marks also have to be removed (the lower mark will be covered by plastic menu) |
 |
| |
| The completed seats attached to the armour plated stands. If you wanted to super detail this model there is plenty of scope and in i/32 information technology would non be that difficult. |
 |
| |
| As I was exam fitting the cockpit together I looked at the musical instrument console and wondered why the B-17 would accept such a large gap at the top betwixt the dials and the shroud. Out of curiousity I consulted my reference material and and then realised it was the kit and not the existent shipping that was off. I idea nigh leaving it alone (after all how much would you actually see) but thats non how I whorl and after most xxx seconds of analysis decided that information technology was a quick fix to reposition the IP dials a little higher to make information technology more than acceptable. | |
 |
| |
| The Duxford restored B-17 is one of the most accurate examples of a wartime aircraft. Here you can run across the actual position of the instruments. Compare this to the image above of the kit IP and yous can see the problem. | |
 |
| |
| The starting time step in removing the backlog space in a higher place the IP is to cutting upwardly the console into 4 parts. This is easiest because the just section that needs to exist raised is the center section with the bodily instruments. | |
 |
| |
| Even though the dials should be raised virtually to the pinnacle, right under the shroud, this would cause another problem with the position of the top of the center console in relation to the IP. When I raised the dials, the center console also needs to exist raised but if you enhance it too much it throws everything else out. So I decided to raise the IP plenty to make it look more than authentic and so raise the eye console by the same amount and then overall it still looks right. The Tamiya tape is used a simple template to cut along to ensure I get the shape correct. |
 |
| |
| The modified IP at present reassmbled (note I chose to leave off the bottom department). |
 |
| |
| I'm not a fan of putting the instrument face (decal in this case) backside the dials. Instead I adopt to punch out each dial face decal and place information technology on the front of the dial bezel. To ensure the dials are non also deep I am using 20 yard card discs to partilly fill the holes for each punch. This mode when the decal is applied to each dial it sits at an accurate depth. My Waldron punch gear up comes in handy on just about every modeling project. |
 |
| |
| One feature I noticed in the cockpits of B-17's is the use of canvass quilting on the sidewalls. E'er looking for something new to try I grabbed some aluminium foil from the kitchen and glued it on using white gum. Using a sharp knife I roughly trimmed the foil around the consoles and switches. |
 |
| |
| Both sides of the cockpit get the foil treatment. |
 |
| |
| The base detailing of the cockpit is at present completed to a level I am happy with (and will be somewhat visible on the finished model). As I mentioned before there is and so much more you could do with this model in terms of detailing only I have chosen to draw the line here. |
 |
| |
| With a model this size it was inevitable that there would exist a lot of ejection pivot marks. There are several common ways to deal with these marks, in this example I used a round blade in my knife and carefully scraped them away. |
 |
| |
| The stop result of the ejection pin removal is not perfect as you lot still see the scrape marks but in this case I think it will exist fine as most of these are buried in the fuselage interior and will be covered with a coat of Night Dull Dark-green paint. |
 |
| |
| I had heard that the primary windscreen clear parts had some fit issues so at this point I decided to test this out. To my relief the fit of the main clear parts was very good. Some minor adjustments will be needed but nothing too much. |
 |
| |
| A simple enhancement to the interior was to open up the three cabin doors. The old doors were drilled and cut away and new doors fashioned from 20 grand plasticard. |
 |
| |
| One of the more puzzling features of the HKM interior is the position of the ammo boxes for the ball turret. HKM have positioned these on the rear bulkhead which I cannot notice any supporting reference for. In fact my research would signal this is totally wrong equally the ammo for the ball turret was either stored internally within the turret (early model) or on larger trays positioned on the top of the turret (late model). I decided that these boxes needed to be removed from the bulkhead completely. |
 |
| |
| The ammo boxes were cut away with a blade and dremmel tool. The large recessed gaps in the bulkhead are also inaccurate (and represent to the radio equipment on the other side of the bulkhead). |
 |
| |
| Plasticard is used to cover the recess. Unfortunately none of this will be visible on the finished model, but it was an piece of cake prepare so no impairment washed. |
 |
| |
| As I program to utilize the wall mountain provided in the kit I did a test fit. Equally you tin encounter the mountain is designed to lock into the bomb bay and is supported by 2 strengthening spars that are positioned fore and aft of the flop bay bulkheads. Quite a clever inclusion by HKM |
 |
| |
| Side by side correction was to remove the stride in the flooring of the radio compartment. This step is needed because HKM have included 2 strengthening spars that come across the fuselage into the wings and 1 of those spars is attached to the front bulkhead of the radio room. The spars are crticial if y'all plan to utilize the wall mounting choice (every bit I practise) and then you lot cannot simply get out them off. A plan for removing the pace was needed to restore the floor to a more accurate shape (ie flat) |
 |
| |
| I determined that the spar could exist cut to accomodate the flooring without substantially weakening it. This would have been a lot easier if I had done it earlier I glued the spar to the bulkhead, merely oh well. I marked out the department that needed to be removed and them used a blade and scribing tool to cut through the spar. |
 |
| |
 |
| |
 |
| |
 |
| |
 |
| |
 |
| |
 |
| |
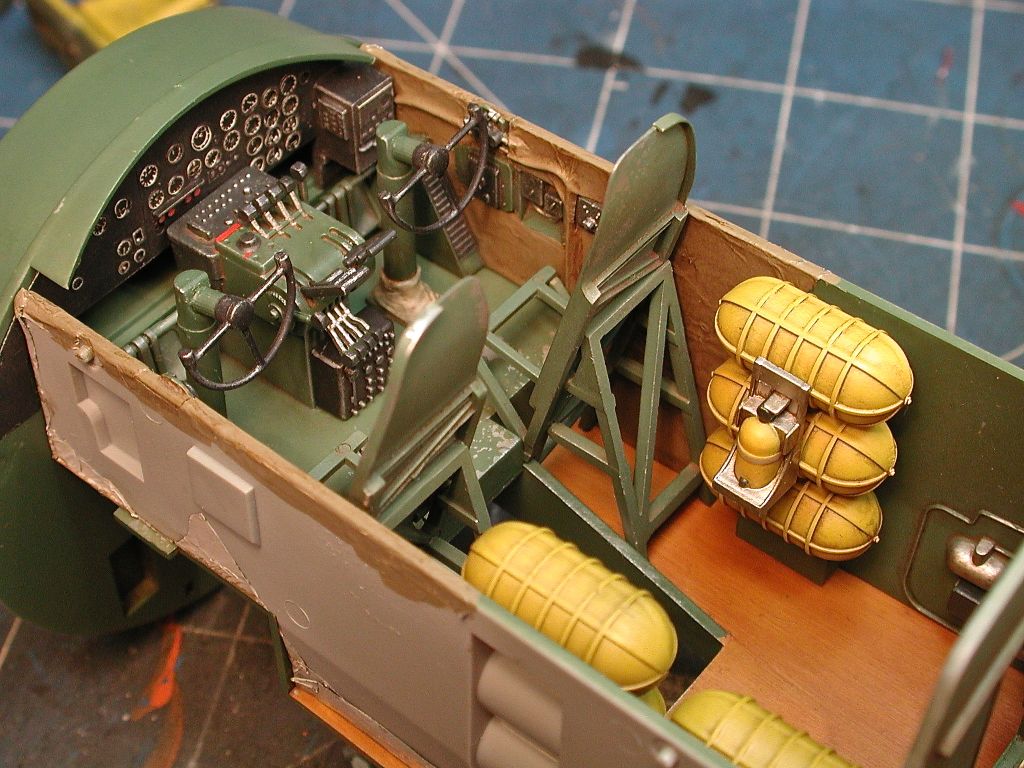
| A view of the radio compartment looking aft. The non sideslip rudder walkway matting in the center of the floor is made from 600 grade wet n dry paper. Note the locating holes for the operators chair that I have congenital using spare parts from the kit sprues. The equipment boxes have simply been hand painted blackness and so drybrushed to pick out the raised detail. I am non overly concerned with details in this compartment as not much will be seen when sealed inside the fuselage. |
 |
| |
| Final touches being added to the radio compartment such as the chair (assembled from spare parts from the HKM sprues), the desk now has an angled metal support arm and some paperwork on the desk-bound to add a trivial bit of life. |
 |
| |
 |
| |
 |
| |
 |
| |
| One challenge that you will accept to meet if you build this kit is replicating the plywood sections. Most of the flooring and all the ammo boxes (plus table tops etc) in the B-17 were fabricated from plywood (to minimise the use of precious metallic and keep the weight down). I found some useful tutorials via Google that made this process adequately painless. Basically a base of operations coat of Tamiya XF-78 Wooden Deck Tan has been covered with a brushed coat of Raw Sienna oil paint. The oil pigment has non been thinned and is therefore fairly thick which results in visible stroke marks of differing shades just like real wood. |
 |
| |
| Experimenting with some farthermost weathering on the bomb bay doors and forward coiffure entry hatch. Applied a base coat of Mr Color C8 Silver with random masking using Mr Masking Sol Neo. Painted a thin coat of Zinc Chromate Yellow primer followed by a second masking with Masking Sol and and then final glaze of Night Ho-hum Dark-green. One time dry out remove all masking with toothbrush (ie scrub the hell out of information technology). Happy with the consequence, should get more control (ie improve) with practice. |
 |
| |
| The Mr Masking Sol Neo was applied past dipping a some packing cream in the liquid mask and so lightly dabbing it onto the model surface. The thought is to get a random mask that when removed reveals the silver underneath. |
 |
| |
| With the major and detail painting of the cockpit (and other interior sections) consummate its time to start gluing things into place. All the parts have received a light wash of Burnt or Raw Umber and a dry brush with Model Master Chrome Silver. |
 |
| |
| A close upwardly of the pilots area reveals some light chipping on the floor. I was also happy with how the canvas kick on the command columns came upwards after painting and a wash. |
 |
| |
| The only thing left to close out the cockpit was the seats themselves. HKM does provide very basic PE belts just for the main pilot and co-airplane pilot seats (which volition be quite visible through the main windscreen) I wanted to add together some belts that would wait a bit better. I used the buckles from the WWII Verlinden set and the belts themselves were from lead foil (from the top of a wine bottle). Super glue is used to concord everything together. |
 |
| |
| The belts are not that circuitous on WWII aircraft (non like modern jets) and so merely a couple of buckles and straps are needed. |
 |
| |
| The completed seats (pilot, co-pilot, radio operator, navigator and bombardier). The HKM PE belts have been used on the radio operator and navigator seats. The bombariers seat has belts from a Lion Roar generic belt ready. |
 |
| |
| The cockpit is now complete (well its had everything done to it that I'grand going to practice). Very happy with how its turned out and the only shame is that most of information technology will not exist visible on the finished model. |
| |
| Just to satisfy my curiousity I assembled the completed cockpit into the fuselage and I'm glad that the extra work washed on the seats will be quite visible from the outside. |
 |
| |
 |
| |
 |
| |
 |
| |
 |
| |
 |
| |
 |
| |
 |
| |
| General purpose aerial bombs have (not surprisingly) remained largely unchanged since WWII. They are still painted Olive Drab, yellowish bands however indicate alive explosives and the basic ballistic shape of the flop has not inverse all that much. Later on the modications I fabricated previously to the mounting locations of the bombs on the racks all that remained was to paint them. I accept used a primer coat of Tamiya X-18 Semi-Gloss Black followed past Tamiya Yellow for the bands. I have used a random selection of multiple bands per bomb to make things expect less compatible and hence more realistic. |
 |
| |
| This image shows an ammo dump at a USAAF base of operations in England during WW2. Ordnance crews are preparing the bombs for the next 24-hour interval's mission. Of notation hither is the finish on the bombs. During WWII most ammo dumps were outside exposed to the weather. Observe how the bombs are stained and marked and thats simply from sitting outside. |
 |
| |
| With the basic painting of the flop trunk (Tamiya XF62 Olive Drab) and the fin (Tamiya WF51 Khaki Drab) consummate I wanted to try and replicate the stained advent of the real thing. I have recently puchased several of the Vallejo Washes and have been looking for a reason to attempt them out. This seemed the perfect test bed. |
 |
| |
| As I did non accept an exact color match for the launder I wanted to try I simply mixed two of the washes I had together. This was liberally applied over the flop torso and fin. Several coats where required to build up the upshot I wanted. This stuff dries very quickly (about 5 mins) so information technology did not accept besides long to punch out ten bombs. |
 |
| |
| With the Vallejo launder not quite dry I used a toothpick to randomly scratch and mark the bomb torso to endeavour and simulate the upshot shown in the photograph above. I was pretty satisfied with the end result. I similar the Vallejo washes and will be adding them to my modeling toolkit. If you look closely you may discover a subtle rust launder on parts of the flop fins. |
 |
| |
| Last footstep is to mucilage the bombs to the racks and here nosotros run into a concluding test fit of everything in the bomb bay. |
 |
| |
| The B-17G has four .50 cal machines guns that are not office of whatever of the turrets. Two in the olfactory organ and ii in the waist (rear fuselage). These guns are fed from plywood ammo crates past flexible belt chutes. The chutes were fabricated from aluminium and of form the ammunition casings were brass. The kit supplied parts wait very nicely detailed and I have painted them Mr Color C8 Silver followed past handbrushing the ammo in the middle of the belt with Tamiya X-12 Golden Leaf. Notation that this is the enamel version of X-12 and not the acrylic version. I have yet to find an acrylic metal paint that has the pigment fine enough to be convincing when practical to the model, hence my regular utilize of laquer and enamel paints for metalics. |
 |
| |
| Once the base of operations colors are dry out, a wash of Vallejo Night Grayness was practical to pick upward all that fine detail in the belts. The Vallejo washes are really very easy to use (no thinning needed just apply direct from the canteen) |
 |
| |
| Another shot of how the wash picks up the very prissy detail in the ammo feed belts provided in the kit. Really no need for aftermarket hither. |
 |
| |
| The waist guns take fairly hefty ammo feed belts fastened to the side and HKM does not provide any existent secure way of mounting these. I decided to add together a couple of 30" contumely pins to the end of the belt to securely lock the gun body and chugalug together. |
 |
| |
| The waist guns are attached to the fuselage windows via a swiveling mounting bracket. A quick test fit of the parts equally shown here reveals some minor adjustments are needed to get everything to line upwardly properly but when it does it looks quite convincing. |
 |
| |
| The painted waist guns with the newly arrived ProfiModeler Brass barrels. The only kit function (other than the barrels) that would do good from replacement is the crosshairs equally these are way over scale. |
 |
| |
| If you lot are trying to decide if the cost of brass replacement barrels is warranted, these photo comparisons of the kit and aftermarket set from Profimodeler may aid. In my opinion the kit barrels are not proficient plenty for a 1/32 B-17 which after all is bristling with these things. |
 |
| |
| A close up shot of 1 of the barrels to give you lot an even better comparison of the plastic and brass parts. |
 |
| |
| The waist guns needs to be attached inside before you close the fuselage. A nice touch by HKM is the power to leave the barrels off until the very stop of the build. This will make handling the model a lot easier during subsequent assembly and painting. |
 |
| |
| With all the interior work now complete (well every bit complete as I wanted to brand information technology) the time has come for some concluding photos before gluing the fuselage halves together. The post-obit images give a good impression of what the final result looked like. |
 |
| |
 |
| |
 |
| |
 |
| |
 |
| |
 |
| |
 |
| |
 |
| |
 |
| |
 |
| |
| With the fuselage interior mostly finished I wanted to build the assorted turrets before I glued the two fuselage halves together. This way I was able to test fit the turrets into the fuselage and deal with any bug more easily. Offset cab off the rank was the peak or dorsal turret. As this volition be quite visible on the final model I did some inquiry on the turret interior and added the firing/steering mechanisms, ammo boxes and assorted cables. To be honest some of it is educated guesswork. |
 |
| |
 |
| |
 |
| |
| The completed turret with the improver of the flexible ammo feed belts (which were borrowed from the Trumpeter 1/32 P-47N kit). Once I add the drinking glass panels to the turret framework I promise that about of this extra item volition notwithstanding be seen. |
 |
| |
 |
| |
| The tail turret interior is too nicely detailed (if not strictly accurate). Notice the finish practical to the contumely barrels. I have used a new technique of chemically burnishing the contumely parts (dipping them in a bath) rather than painting them. The end result is quite realistic and unlike pigment does add add any extra thickness to the parts. The chemicals to attain were from Uschi Van Der Rosten - Burnishing Amanuensis for Contumely Barrels and Photo Compose |
 |
| |
| The olfactory organ is a separate sub-associates and its sensible to presume HKM will release before variants of the B-17 with different noses. I've built this surface area pretty much out of the box and believe it will exist quite adequate once closed up and viewed from the outside in. |
 |
| |
 |
| |
 |
| |
| Sad to say that's every bit far as I've gotten. For the moment this projection is on hold awaiting some more fourth dimension and motivation. |
 |
0 Response to "Hk Models 1/32 B-17g Model Kit Detailed Review"
Post a Comment